Bind Anvil components to Tableau filters and parameters
Keeping Anvil components in sync with components on the dashboard is straight forward and simple using Anvil data bindings.
For this how-to, we’ll assume that our Tableau dashboard has a single filter and a single parameter, and our Anvil extension has a text box and a multi-select drop down component.
Let’s look at some form code:
 1from ._anvil_designer import BindComponentsTemplate
 2from anvil import tableau
 3
 4from trexjacket.api import get_dashboard
 5
 6class BindComponents(BindComponentsTemplate):
 7  def __init__(self, **properties):
 8    self.dashboard = get_dashboard()
 9    self.param = self.dashboard.get_parameter('myparam')
10    self.filter = self.dashboard.filters[0]
11
12    self.init_components(**properties)
13
14    self.dashboard.register_event_handler('parameter_changed', self.refresh_data_bindings)
15    self.dashboard.register_event_handler('filter_changed', self.refresh_data_bindings)
Notice that I’ve registered refresh_data_bindings to both the parameter_changed and filter_changed events. The only other step is to define the data bindings using the Anvil editor.
For the text box, bind the text property of the text box to self.param.value and enable write back.

Checking the “Write back” box allows this assignment to go both ways and thus keeping Tableau and our Anvil extension in sync with each other.
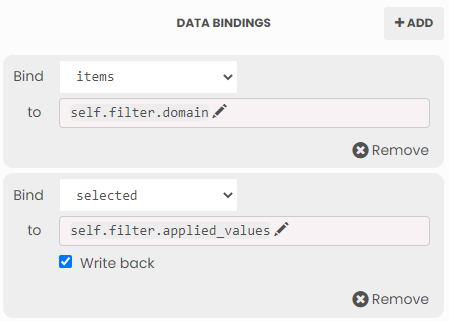
The multi-select dropdown works similarly, but we’ll need to bind the following:
Drop down’s
itemstoself.filter.domainDrop down’s
selectedtoself.filter.applied_values, and enable write back
Once you’ve added the data bindings, your drop down and text box should be in sync with the Tableau dashboard!
Here’s what the extension should look like
For more information on data bindings, see the anvil docs here.
Click here to clone the Anvil used for this howto
Click here to download the Tableau workbook.