Chapter 3: Showing Overrides in the Dashboard
In the last chapter we saved the overrides to an Anvil Data Table. In this chapter we’ll connect our Tableau Dashboard to our Anvil Data Table so we can insert the overrides into a tooltip.
First we’ll need to gather our database credentials from Anvil:
Click the Anvil X logo on the left sidebar

Click “Enable” in Step 3.

Note the “Server name”, “Username”, and “Password” fields

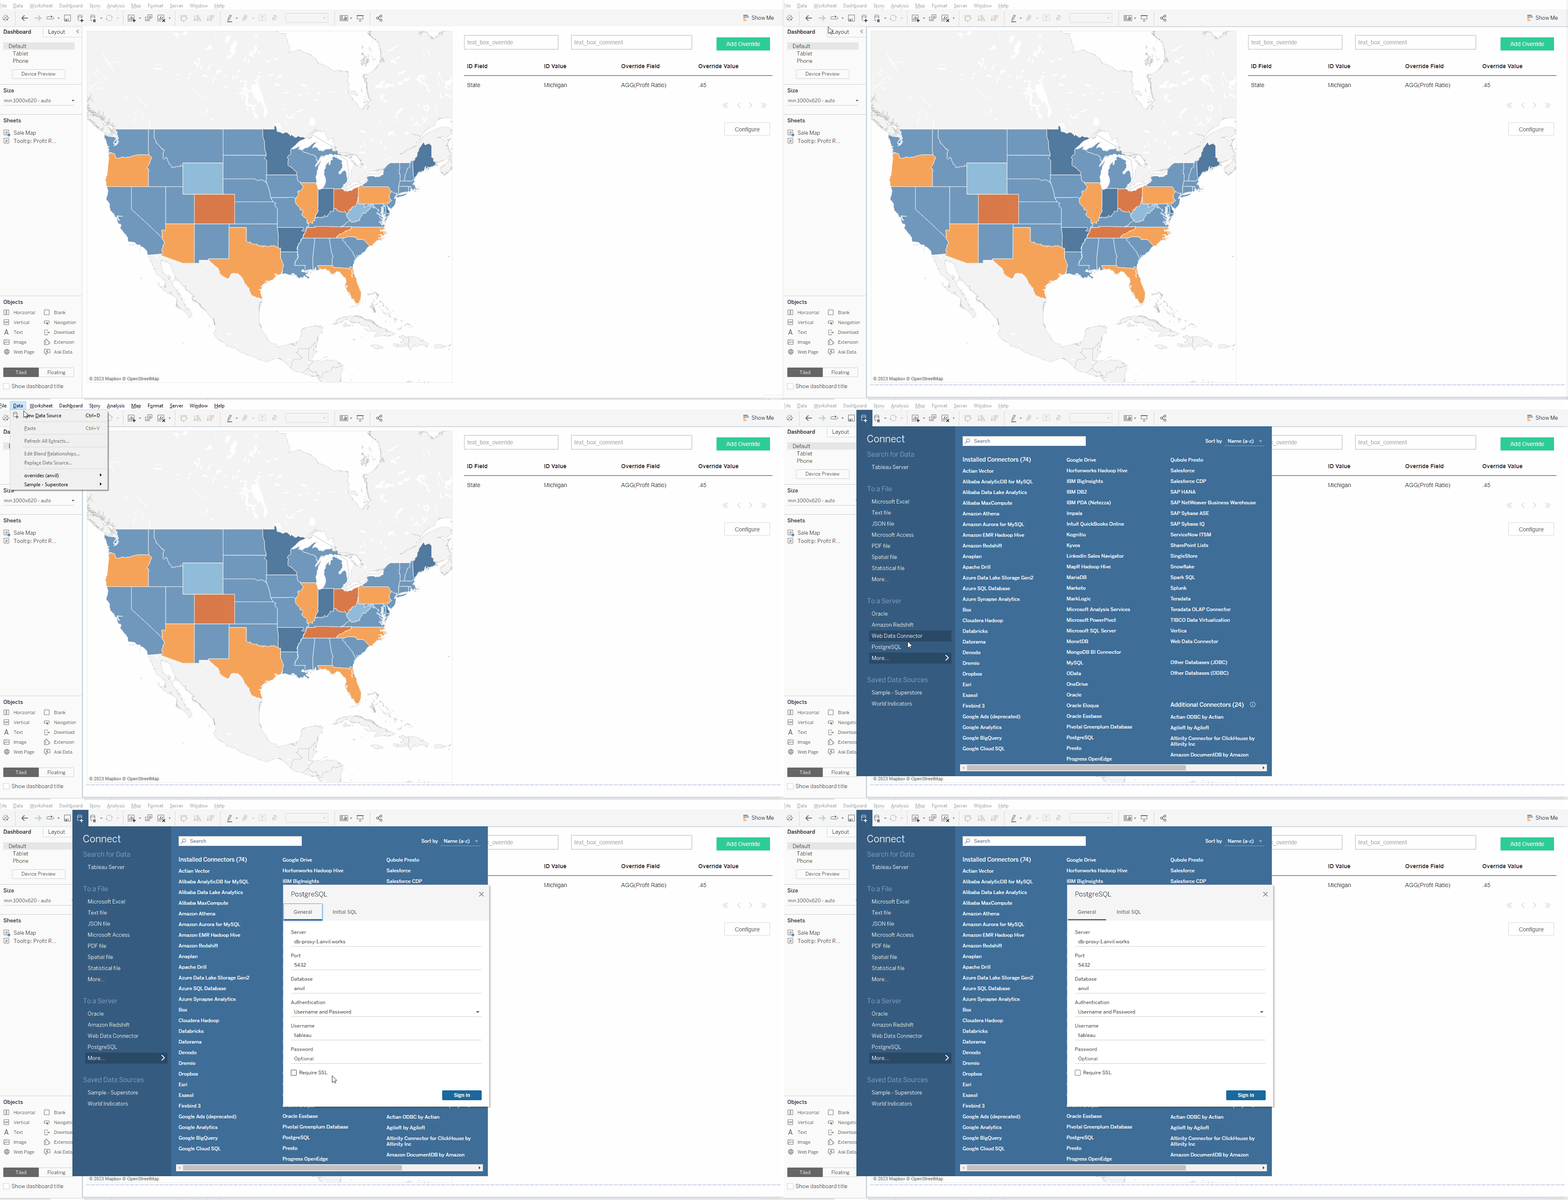
Now that we have our credentials we’ll need to add our Anvil Data Table as a new datasource to our Tableau dashboard:

In Tableau:
Click “Data” in the top ribbon
Click “New Data Source”
In the “To a server” section, click “PostgreSQL”
Input the server name, username, and password from we copied from Anvil
Now that we have our Anvil data table as a datasource, let’s add the override value to the tooltip:

Go to our worksheet (You should now see the
overridestable from Anvil)Click “Data” > “Edit Blend Relationship” in the top ribbon
Click “Custom” and then “Add…”
Set the “Primary data source field” to “State” and the “Secondary data source field” to “Id Value”. Then click “OK” to close the dialogue
In the “Data” pane on the left, click “overrides (Anvil)”, and drag the “Override Value” to the “Tooltip” box in the “Marks” section
Click the “tooltip” box and insert the “Override Value” to the tooltip.
Test it out
Hovering over each state should now show you the override value in the tooltip!
One last thing, we’ll want to refresh this datasource whenever someone adds a new override. We can use the refresh method of our datasources to refresh them whenever an override is saved:
Homepage code
 1from ._anvil_designer import HomepageTemplate
 2import anvil
 3from anvil.tables import app_tables
 4from datetime import datetime
 5
 6from trexjacket.api import get_dashboard
 7from trexjacket import dialogs
 8
 9class Homepage(HomepageTemplate):
10  def __init__(self, **properties):
11    self.dashboard = get_dashboard()
12    self.repeating_panel_1.items = app_tables.overrides.search()
13    self.init_components(**properties)
14
15  @property
16  def worksheet(self):
17    # Here we use the settings we configured to dynamically get the worksheet
18    return self.dashboard.get_worksheet(self.dashboard.settings['worksheet'])
19
20  def btn_configure_click(self, **event_args):
21    dialogs.show_form('configure_form', width=900, height=900)
22    self.refresh_data_bindings()
23
24  def btn_submit_click(self, **event_args):
25    # If the user hasn't filled out the override and comment fields
26    # and if they haven't selected anything, return
27    if not all([
28      self.text_box_override.text,
29      self.text_box_comment.text,
30      self.worksheet.get_selected_marks()[0]
31    ]):
32      return
33
34    selected_record = self.worksheet.get_selected_marks()[0]
35
36    app_tables.overrides.add_row(
37      id_value = selected_record[self.dashboard.settings['id_field']],
38      id_field = self.dashboard.settings['id_field'],
39      override_field = self.dashboard.settings['override_field'],
40      override_value = self.text_box_override.text,
41      who = selected_record[self.dashboard.settings['username']],
42      comment = self.text_box_comment.text,
43      on = datetime.now()
44    )
45    self.repeating_panel_1.items = app_tables.overrides.search()
46
47    # Refresh the Anvil datasource
48    self.dashboard.get_datasource('overrides (postgres)').refresh()
49
50    anvil.Notification('Override saved!').show()
51
52    # Reset our text boxes
53    self.text_box_comment.text = ''
54    self.text_box_override.text = None
Now everytime an override is added the datasource will update!

Looking for more to do?
If you’d like to keep working on this extension, here are some new features you could implement:
Handle multiple overrides for the same state
Show the timestamp and user who made the comment in the Tableau tooltip
Hide the “Submit” button in the
Homepageform until a user selects a state on the dashboard
If you’re looking for something new, consider working through the next tutorial, Update Salesforce Opportunities, which shows how Salesforce can be integrated into an extension using Anvil X.
Download the resources used in this tutorial!